Quick Start Guide (Android)
To use the middleware you will first need a Castles MP200 loaded with EBizCharge's Payment Engine software. For information on ordering the device, contact your merchant service provider.
The easiest way to get started with the middleware SDK is to download and build the demo application:
- You will need: Android Studio 2.1+, a supported Android device, and a Castles MP200 with the latest terminal software.
- Download the latest demo application.
- Extract the zip and open the enclosed project "MP200_public_demo".
- Resolve any missing plugins and SDKs.
- Add the following to your AndroidManifest.xml in order to grant permissions for Bluetooth.
<uses-permission android:name="android.permission.BLUETOOTH" />
<uses-permission android:name="android.permission.BLUETOOTH_ADMIN" />
<uses-permission android:name="android.permission.INTERNET" />
- Edit the file "app/src/main/java/com/EBizChargedemo/MainActivity.java" and update following lines to include your source key and PIN. Also uncomment the host line if sandbox is being used. Please Note: Source keys must have a PIN configured for the middleware to function.
private String sourceKey = "INSERT SOURCE KEY HERE";
private String pin = "INSERT PIN HERE";
//    private String host = "sandbox.EBizCharge.com";
- Pair the Terminal and Android device.
STEP 1: On your supported Android device, go to Settings -> Device -> Wireless -> Bluetooth -> select the MP200 device.
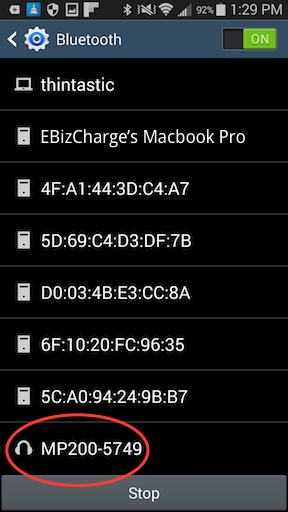
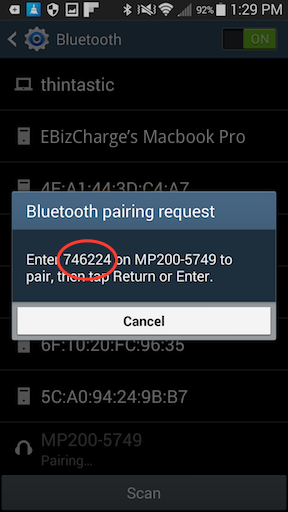
STEP 2: Press and hold the Bluetooth button on the MP200 until it requests a PIN, then select the MP200 in the Bluetooth menu of the Android device and enter the PIN on the MP200.
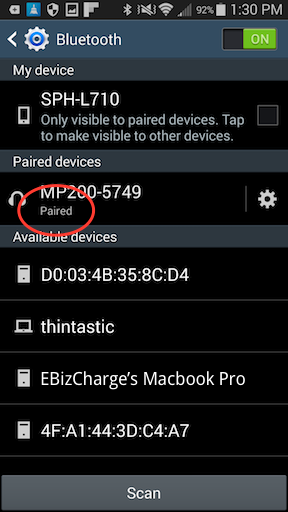
STEP 3 Wait until the Android device displays a green check mark and click "OK". On your phone/tablet you should see the MP200 listed in the "Paired Devices". Please Note: If the MP200 is going to be used with multiple phones/tablets, it must be unpaired from other devices before it can be paired a new phone/tablet.
- Build and run the demo app on your Android device.
SDK Usage Overview
Instantiation
First, instantiate the UEMiddleware class:
private UEMiddleware ueMiddleware;
ueMiddleware = new UEMiddleware("MP200", parent, eventDelegate, logDelegate);
- The first parameter is the type of device that is being targeted. If multiple
devices of the same type are connected, the first will be selected.
Alternately, a list of connected devices can be retrieved and a specific device can be passed as the first parameter. See the constructor documentation for details. - The second parameter is the parent activity. The middleware needs this to access bluetooth functionality, access files, etc.
- The third parameter is the call back delegate. This delegate will handle all callbacks from the middleware. It must implement the UEMiddlewareInterface. In the demo application, this is the TransactionHelper class. See the UEMiddlewareInterface documentation for a list of the available call back functions.
- The fourth parameter is the logging delegate. This delegate allows developers to track the internal state of the middleware. It must implement the OnLog interface.
Connecting to Device
The next step is to connect to the terminal.
ueMiddleware.connect(mConnType, sourceKey, pin);
// or to sandbox is being used:
// ueMiddleware.connect(mConnType, sourceKey, pin, "sandbox.EBizCharge.com");
- The first parameter is the type of connection: use "BT" for bluetooth or "USB" for usb.
- The second parameter is the merchant's source key and the third parameter is the merchant's PIN. Please Note: Both are required. Source keys without PINs are NOT supported by the middleware.
- The fourth parameter is optional. It can be used to override the gateway host being connected to. It is normally used to switch to the sandbox system.
The connection process may take some time because the middleware is verifying the firmware version and the config of the payment terminal. When the update is complete and the device connected, the onConnected method on the callback delegate will be called.
If any problems are encountered the onError method will be called.
Starting a Transaction
Once a connection is established between the phone/tablet and the payment device, the next step is to start the transaction.
ueMiddleware.startTransaction(transInfo, sourceKey, pin, manualKey, prompTip);
- The first parameter is a HashMap that holds UEMConstants as keys and the corresponding transaction details as the values.
- The second and third parameters are the source key and PIN for the merchant.
- The fourth parameter is a boolean when set to true will trigger a manually-keyed transaction.
- The fifth parameter is a boolean when set to true will prompt the customer for a tip.
Once the transaction finishes processing, the onTransactionComplete method on the callback delegate will be called.
After a Transaction Completes
Once a transaction has completed, the onTransactionComplete method on the callback delegate will be called. At this point, the disconnect method needs to be called and UEMiddleware object must be re-instantiated.
ueMiddleware.disconnect();
Additional Information
Tip Support
If merchants wish to support tip amounts, there are several options available:
Prompt for Tip in App
- The developer should prompt for tip in the UI of their application.
- startTransaction is called with the tip field present in the transInfo HashMap and the prompTip parameter set to false.
- The amount field should include the tip amount in the total.
- Works with all card types, regardless of supported CVMs.
- Works regardless of the terminal config.
Prompt for Tip on Terminal
- startTransaction is called with prompTip parameter set to true.
- Terminal will prompt customer to enter tip amount.
- Tip amount is added onto the original amount and passed in the transInfo HashMap in the amount field for authorization.
- Works with all card types, regardless of CMV support.
- Will not work with the Tip Adjust terminal config. Use the ALLCVM base config and make sure enable_tip_adjust parameter is set to false.
Adjust Tip Post Authorization
- startTransaction is called with amount field NOT including tip amount.
- After authorization, the tip amount is typically entered on paper receipt in conjunction with signature.
- startTransaction is called again with the amount field set to new total (which now includes the tip amount), the tip field set to the tip amount and the refNum field set to the transaction refnum received during the original authorization.
- PIN CVM must be disabled and will NOT work with cards that require PIN CVM.
- Will not work with the ALLCVM terminal config. Use the Tip Adjust base config and make sure enable_tip_adjust parameter is set to true.
Software Updates
The payment engine SDK will automatically push updates to the terminal as needed including firmware, terminal configs, display configs and CAPKs. This automatic update is initiated when the connect() method is used.
For automatic updates to be successful, the developer will need to maintain a current version of the payment engine SDK. In addition to checking the version of software on the terminal, the SDK also cross checks against the version of the SDK library. If a developer allows the SDK to get too far out of date, it may not be able to support newer devices due to version incompatibility. When this situation arises, the connect() method will result in an onError().